Battery switch on travel trailer function is crucial for managing your RV’s power. Understanding how this seemingly simple switch works can significantly impact your battery life, prevent electrical issues, and even enhance your camping experience. This guide breaks down the different types of switches, their roles in your trailer’s electrical system, and how to troubleshoot problems. We’ll cover everything from basic functionality to advanced upgrades, ensuring you’re comfortable and confident managing your RV’s power.
From single-pole switches to more complex double-pole double-throw setups, each type offers unique capabilities. We’ll delve into the specifics of how they interact with your converter, inverter, and solar panels, and explore best practices for optimizing battery life and preventing costly mistakes. We’ll also cover safety precautions and how to identify and fix common problems, ensuring a safe and worry-free camping adventure.
Battery Switch Types in Travel Trailers: Battery Switch On Travel Trailer Function
Understanding your travel trailer’s battery switch is crucial for managing power and preventing electrical issues. Different switches offer varying levels of control and protection. This section will break down the common types and their functionality.
Battery Switch Types
Travel trailers typically utilize a few main types of battery switches: single-pole, double-pole, and double-pole double-throw. These switches control the flow of electricity from your batteries to the trailer’s electrical system. The choice of switch depends on the number of batteries and the level of control desired.
Single-Pole Battery Switches
A single-pole switch controls a single circuit. In a travel trailer context, this means it controls the power from one battery to the trailer’s 12-volt system. It’s a simple on/off switch, effectively disconnecting the battery from the trailer’s electrical system when turned off. Internally, it’s a basic switch mechanism that breaks the circuit when turned to the “off” position.
Imagine a simple light switch in your home; it operates on the same principle.
Double-Pole Battery Switches
Double-pole switches control two circuits simultaneously. In a travel trailer, this usually means controlling both positive and negative leads from a single battery. This provides better safety by isolating both sides of the circuit, minimizing the risk of accidental shorts or electrical shocks. Internally, it’s like having two single-pole switches working together in one unit. Both the positive and negative connections are simultaneously broken when the switch is off.
Double-Pole Double-Throw Battery Switches
Double-pole double-throw (DPDT) switches are more complex. They allow switching between two sources, typically two batteries. This is useful for having a main house battery and a secondary battery for auxiliary functions. The switch allows selecting either battery as the primary power source, or isolating both. Internally, this involves a more intricate switching mechanism with multiple contacts to handle the switching between different power sources.
Think of it as a three-way switch, but for two batteries.
Battery Switch Comparison Table, Battery switch on travel trailer function
| Type | Number of Batteries Controlled | Circuit Protection | Common Applications |
|---|---|---|---|
| Single-Pole | One | Basic on/off control | Simple battery disconnect |
| Double-Pole | One | Simultaneous positive and negative disconnection | Improved safety, single battery systems |
| Double-Pole Double-Throw | Two | Switching between two batteries or complete disconnection | Multiple battery systems, switching between house and auxiliary batteries |
Identifying Your Battery Switch Type
To identify your battery switch type, visually inspect the switch itself. Look for markings indicating the number of poles and throws. A single-pole switch will have one lever or switch controlling a single circuit. A double-pole switch will have two levers or switches, or a single lever controlling two separate circuits. A DPDT switch will have a more complex arrangement, typically allowing for selection between multiple sources.
Also, count the number of battery terminals connected to the switch; this can provide a clue about the switch’s capability. Carefully examine the wiring connections to further confirm your assessment. Remember to disconnect the power before any inspection.
So, you’re planning a trip? Awesome! Don’t forget to sort out your travel insurance. Check out aon travel insurance for comprehensive coverage; they’re pretty reputable. Then, once you’ve got that sorted, you can start focusing on the fun stuff like packing and choosing your outfits. Another great option to consider is aon travel insurance , which often has competitive prices and good customer reviews.
Comparing quotes from both is a smart move before you finalize your booking!
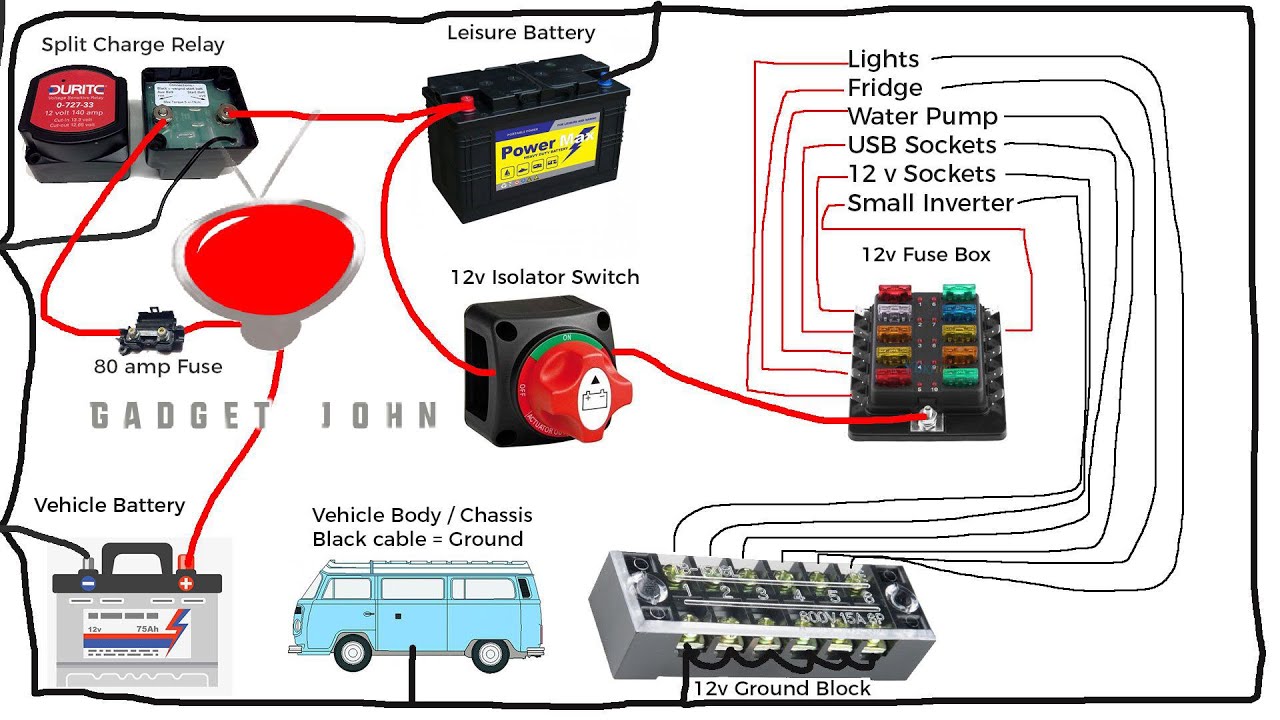
Battery Switch Functionality and its Role in Power Management
The battery switch is the central control for your travel trailer’s house batteries, acting as a crucial on/off switch and a key player in managing power flow. Understanding its function is vital for efficient power usage and extending the life of your batteries. Think of it as the main power valve for your off-grid electricity.The battery switch’s primary role is to disconnect the house batteries from the rest of the trailer’s electrical system when not in use.
So, you’re planning a trip? Awesome! Don’t forget travel insurance! Check out aon travel insurance for comprehensive coverage. They’ve got options for everything from lost luggage to medical emergencies. Seriously, it’s a lifesaver. And if you want another option to compare, look at aon travel insurance – sometimes different providers offer slightly different benefits, so comparing is key to finding the best fit for your trip.
Getting insured is just smart travel planning!
This prevents parasitic drain – the slow, constant discharge of your batteries caused by small electrical draws from things like clocks or carbon monoxide detectors, even when the trailer isn’t connected to shore power. This parasitic drain can completely deplete your batteries over time if left unchecked. By switching the batteries off, you essentially cut the power to everything except potentially a battery-powered alarm system, preventing this unwanted drain.
Battery Switch Interaction with Other Components
The battery switch acts as a gatekeeper, controlling the flow of power to and from various components. When the switch is on, power from the batteries flows to the converter (which changes 12V DC to 120V AC for your household appliances), the inverter (which changes 12V DC to 120V AC for higher-power appliances), and any other 12V DC devices.
If you have a solar panel charger, it will also charge the batteries when the switch is on, but this is generally independent of the switch’s position, although some systems might incorporate the switch into the charging circuit for added safety. When the switch is off, these components are disconnected from the batteries, conserving battery power.
Optimizing Battery Life and Preventing Overcharging
Proper use of the battery switch is essential for maximizing battery lifespan and preventing damage from overcharging. Always turn the switch off when the trailer is not in use for extended periods. This prevents parasitic drain and extends the time between charges. Regularly checking your battery voltage is also crucial. Overcharging can damage your batteries, shortening their lifespan and potentially creating safety hazards.
While modern solar charge controllers and converters usually have built-in safeguards against overcharging, using the battery switch appropriately adds an extra layer of protection. For example, if you anticipate leaving your trailer unused for several weeks, switching off the batteries will dramatically reduce the likelihood of them becoming deeply discharged. Conversely, if you’re regularly using the trailer and the batteries are consistently being charged, the switch will play less of a critical role in preventing overcharging but is still useful to protect against any potential issues.
Safety Precautions When Working with Battery Switches
Working with a travel trailer’s electrical system, especially the battery switch, requires careful attention to safety. Improper handling can lead to serious injury from electric shock, burns, or even explosions from the battery itself. Understanding and following safety procedures is paramount to prevent accidents and ensure a safe working environment.Working with 12-volt DC circuits in a travel trailer might seem less dangerous than higher-voltage AC circuits, but they can still deliver a painful and potentially hazardous shock.
The battery itself holds a significant amount of stored energy, and a short circuit can generate intense heat and potentially ignite flammable materials. Always treat the system with respect and follow the safety precautions Artikeld below.
Essential Safety Equipment
Before beginning any work on your travel trailer’s electrical system, gathering the necessary safety equipment is crucial. This equipment protects you from potential hazards and allows you to work confidently and safely.
- Insulated gloves: These gloves provide a barrier between your skin and the electrical components, preventing shocks. Look for gloves specifically rated for electrical work and check their condition before each use.
- Safety glasses: Protecting your eyes from sparks, flying debris, or battery acid splashes is essential. Choose glasses that offer good impact resistance.
- Battery terminal cleaner: This tool helps ensure clean connections, minimizing the risk of sparks or poor contact. A wire brush is also a good option.
- Wrench or socket set: The correct size wrench or socket is needed to safely disconnect and reconnect battery terminals without damaging them. Avoid using pliers, which can damage the terminals.
- Baking soda and water: Keep a solution of baking soda and water on hand to neutralize any battery acid spills. Battery acid is corrosive and can cause serious damage to skin and eyes.
Disconnecting the Battery
Properly disconnecting the battery is the first and most important step in any electrical work on your travel trailer. Failure to do so correctly can result in accidental shorts, shocks, and other hazards.
- Always disconnect the negative (-) terminal first. This helps prevent accidental shorts and reduces the risk of sparks. Use your wrench or socket to loosen and remove the negative cable clamp.
- Once the negative terminal is disconnected, you can then disconnect the positive (+) terminal. Again, use your wrench or socket to carefully remove the clamp.
- After disconnecting the battery, visually inspect the terminals and cables for any signs of damage, corrosion, or loose connections. Clean any corrosion with a battery terminal cleaner before reconnecting.
Working with the Battery Switch
The battery switch itself should be treated with the same care as the battery terminals. Always ensure the switch is in the “OFF” position before disconnecting or working on any related components. Never work on the switch with the battery connected.
Risks Associated with Improper Handling
Improper handling of battery switches and related components can lead to several serious risks, including:
- Electric shock: Contact with live wires or terminals can result in painful and potentially dangerous electric shocks.
- Burns: Short circuits can generate significant heat, leading to burns from hot wires or battery components.
- Battery explosion: Improper handling of a battery, such as sparking near flammable materials or a short circuit, can cause the battery to explode, releasing corrosive acid and potentially causing injury or fire.
- Damage to electrical components: Improper handling can damage the battery switch, wiring, or other components, leading to costly repairs or replacements.
Battery Switch and its Impact on Battery Life
Proper use of your travel trailer’s battery switch significantly impacts the lifespan of your batteries. Understanding how the switch functions and how different configurations affect charging and discharging is crucial for maximizing battery life and avoiding costly replacements. Neglecting proper switch operation can lead to premature battery failure and potentially leave you stranded.Proper battery switch usage extends battery life by preventing over-discharge and ensuring efficient charging.
Leaving your batteries connected to the trailer’s electrical system when not in use can lead to a slow drain, eventually causing sulfation and reducing their capacity. Conversely, consistently disconnecting the batteries when not needed prevents this parasitic drain, significantly prolonging their lifespan. Using a battery switch allows you to easily control this connection, preventing unwanted discharge.
Battery Switch Configurations and Their Effects
Different battery switch configurations influence charging and discharging. A single switch controls all batteries simultaneously, meaning they’re either all connected or all disconnected. This simplicity can be convenient, but it offers less control. Multiple switches, perhaps one for the house batteries and another for the starting battery, allow for more granular control. You can, for example, disconnect the house batteries while keeping the starting battery connected for easier engine starting.
This prevents unnecessary drain on the house batteries while ensuring the engine can still start. The best configuration depends on your specific needs and the number of batteries in your setup.
Effects of Incorrect Battery Switch Usage
Imagine a scenario: You leave your travel trailer parked for several weeks without disconnecting the house batteries via the switch. A small, continuous drain from interior lights or appliances slowly depletes the battery. This constant, low-level discharge leads to sulfation – a buildup of lead sulfate crystals on the battery plates. Sulfation reduces the battery’s ability to accept a charge and ultimately lowers its overall capacity and lifespan.
This is visually represented as a gradual decline in battery voltage over time even when connected to a charger. The battery might show a seemingly full charge, but its actual capacity is diminished. In contrast, correctly using the battery switch to disconnect the batteries when not in use prevents this slow drain, keeping the batteries healthier and extending their service life.
This scenario is comparable to leaving a phone constantly plugged in with a minor app draining its battery in the background; it won’t necessarily die quickly but will wear down much faster than if properly managed.
Mastering your travel trailer’s battery switch is key to enjoying worry-free adventures. By understanding its function, troubleshooting potential problems, and employing proper safety measures, you can maximize your battery life and keep your RV running smoothly. Remember, regular maintenance and a proactive approach to electrical system care will save you headaches (and potentially expensive repairs) down the road.
So, get out there and enjoy the open road!
Questions and Answers
What happens if I leave my battery switch on all the time?
Leaving the switch on constantly can drain your batteries, especially if there’s a parasitic draw (something using power even when everything’s turned off). It’s best to turn it off when not using the trailer for extended periods.
How do I know if my battery switch is bad?
Symptoms of a bad switch include no power to appliances even with fully charged batteries, or the switch itself feeling loose or not clicking properly. Corrosion on the terminals is another common sign.
Can I use a different type of battery switch as a replacement?
While some switches are interchangeable, it’s crucial to choose a replacement with the correct amperage rating and number of poles to match your existing setup. Improper replacement can damage your electrical system.
How often should I inspect my battery switch?
Regular inspection, at least once or twice a year, or before each extended trip, is recommended. Check for corrosion, loose connections, and proper functionality.
